

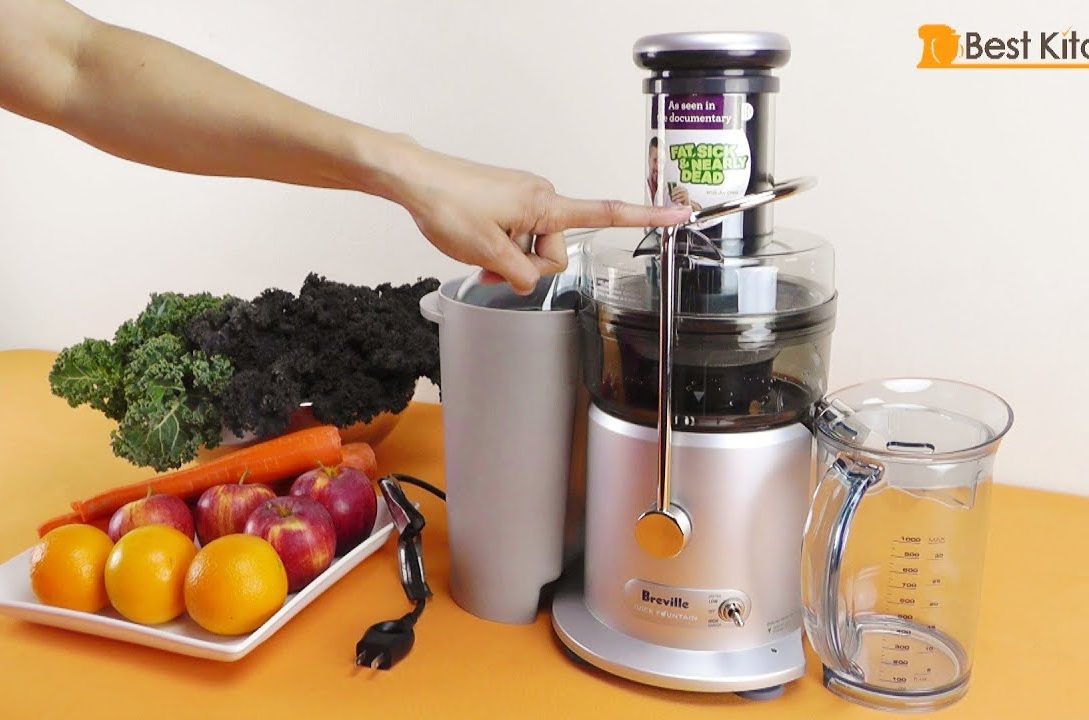
To use the breville juicer, first assemble the juicer by following the instructions in the user manual. Then, feed your desired fruits or vegetables into the juicer chute and switch it on to begin juicing.
Introducing the breville juicer, a versatile and powerful kitchen appliance that allows you to create healthy and delicious juices in the comfort of your own home. With its sleek design and easy-to-use features, this juicer is perfect for anyone looking to incorporate more fresh fruits and vegetables into their diet.
Whether you’re a juicing enthusiast or a beginner, the breville juicer is designed to make the juicing process simple and efficient. We will guide you through the step-by-step process of using the breville juicer, from assembling the machine to enjoying a glass of freshly squeezed juice. So, let’s get started and discover how you can make the most of your breville juicer.
Credit: www.breville.com.ph
Choosing The Right Breville Juicer Model
Choosing the right breville juicer model is essential for effectively using the juicer. Understanding the features and specifications of each model can help you make an informed decision that suits your juicing needs.
When it comes to selecting the perfect breville juicer for your needs, there are a few factors to consider. Breville offers a range of juicer models, each with its own unique features and benefits. To help you make an informed decision, let’s explore the factors to consider when selecting a breville juicer and take a closer look at some popular models:
Factors To Consider When Selecting A Breville Juicer:
- Juicing needs: Determine what you plan to juice most frequently. Are you looking to extract juice from leafy greens, fruits, or a combination of both? This will help you choose a juicer that is specifically designed to handle your preferred ingredients.
- Juicer type: Breville offers both centrifugal and masticating juicers. Centrifugal juicers work quickly and are ideal for those looking for a fast juicing process. On the other hand, masticating juicers operate at a slower speed, preserving more nutrients and producing higher juice yields.
- Motor power: Consider the power of the juicer’s motor, as it can impact the juicing efficiency. If you plan to juice tougher produce like carrots or beets, a more powerful motor will ensure smooth juicing without any clogging or jamming.
- Ease of use and cleaning: Look for a juicer that is user-friendly and easy to assemble, disassemble, and clean. Opt for models with dishwasher-safe parts for effortless maintenance.
- Size and storage: Evaluate the available countertop space in your kitchen and choose a juicer size that fits your needs. Additionally, consider whether the juicer can be easily stored when not in use.
Popular Breville Juicer Models And Their Features:
- Breville juice fountain compact: This compact centrifugal juicer is perfect for small kitchens or individuals with limited counter space. It features a powerful motor, easy-to-clean design, and a wide chute that reduces preparation time.
- Breville juice fountain elite: With its extra-wide feeding chute and powerful motor, this centrifugal juicer makes juicing large quantities a breeze. It also includes a stainless steel cutting disc and a sleek design that adds a touch of elegance to your kitchen.
- Breville big squeeze: If you prefer a masticating juicer, this model is worth considering. It operates at a slow speed, ensuring maximum juice extraction and nutrient retention. The big squeeze also comes with a convenient smart cap, allowing for easy blending of different juice flavors.
- Breville juice fountain cold xl: Designed for those who prioritize convenience, this centrifugal juicer comes with a large capacity jug and an innovative cold spin technology, which reduces heat transfer and helps maintain the freshness of your juice for up to 72 hours.
- Breville juice fountain cold: This compact yet powerful centrifugal juicer is perfect for juicing enthusiasts who want to preserve nutrients. It features cold spin technology, a powerful motor, and a unique elevated juicing system for maximum juice yield.
Remember to consider your personal preferences, juicing needs, and kitchen space when selecting the right breville juicer model. By choosing the model that aligns with your requirements, you’ll be on your way to enjoying fresh and nutritious juice at home.
Unboxing And Assembling The Breville Juicer
Learn how to unbox and assemble the breville juicer effortlessly. This step-by-step guide will teach you how to use the juicer for maximum efficiency and delicious results.
Step-By-Step Guide To Unboxing The Juicer:
- First, find a clean, spacious area to unbox the breville juicer. Make sure you have enough room to freely move around and access all the parts.
- Carefully open the packaging and remove all the components. Check that everything is included and in good condition.
- Dispose of any packaging materials in an environmentally friendly manner.
- Take a moment to read the user manual for any specific instructions or precautions.
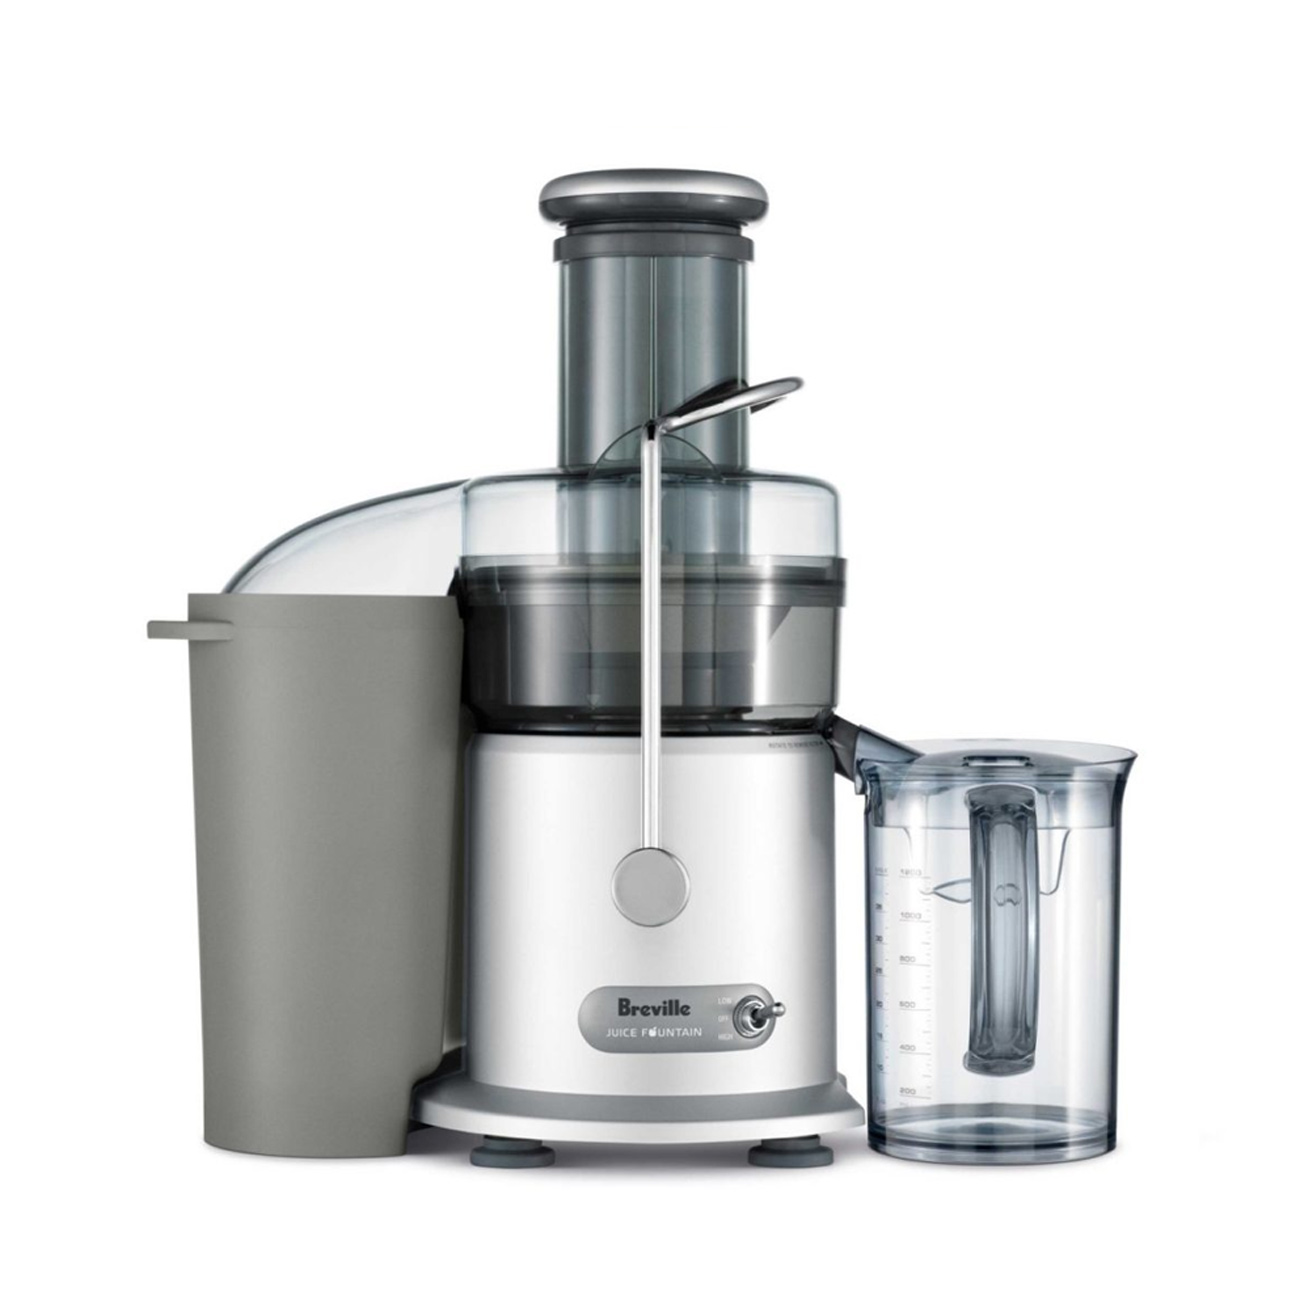
- ### understanding the different parts and components:
- The breville juicer consists of several key parts that need to be assembled correctly for optimal performance. Familiarize yourself with each component:
- Juice container: This is where the extracted juice will collect.
- Pulp container: The pulp leftover from the juicing process is collected here.
- Feed chute: The large opening at the top of the juicer where you will insert your fruits and vegetables.
- Nutri disc: The stainless steel disc that extracts juice from the produce.
- Filter basket: The mesh filter that separates the juice from the pulp.
- Food pusher: Used to safely push the ingredients down the feed chute.
- Juice spout: The outlet where the juice flows out.
- Base unit: The main unit of the juicer that houses the motor.
- ### tips for proper assembly:
- Ensure each part is clean and dry before starting the assembly process.
- Start by attaching the filter basket onto the motor base. Make sure it is securely locked in place.
- Place the nutri disc on top of the filter basket, aligning the central spindle.
- Insert the pulp container into its designated position, usually on the front or side of the juicer.
- Attach the juice container to the juice spout, ensuring it is properly aligned and stable.
- Place the food pusher into the feed chute, ready to be used when juicing.
- Carefully power on the juicer and begin juicing your desired fruits and vegetables.
- Ensure all components are securely locked in place before operating the juicer.
- Remember to refer back to the user manual for any additional guidance or troubleshooting.
By following these steps, you will be able to unbox and assemble your breville juicer with ease. Enjoy the benefits of fresh, homemade juice at your fingertips!
Preparing Fruits And Vegetables For Juicing
Learn how to prepare fruits and vegetables for juicing with the breville juicer. Get the most out of your juicing experience by following these simple steps to ensure optimal flavor and nutrition in every glass.
When using the breville juicer, it is essential to properly prepare your fruits and vegetables to ensure optimal juicing results. This involves selecting fresh and ripe produce, properly washing and cleaning the ingredients, and cutting and preparing them for juicing.
Let’s delve into each of these steps in more detail:
Selecting Fresh And Ripe Produce:
- Choose fruits and vegetables that are at their peak ripeness to get the best flavor and nutritional value.
- Look for firm produce without any bruises or blemishes.
- Ensure that the fruits and vegetables are free from mold or signs of decay.
- Opt for organic options whenever possible to reduce exposure to pesticides and other chemicals.
Properly Washing And Cleaning The Ingredients:
- Before juicing, thoroughly cleanse your fruits and vegetables to remove any dirt, bacteria, or residual chemicals.
- Rinse them under cool running water and gently scrub with a vegetable brush if necessary.
- For leafy greens, immerse them in a bowl filled with water and swish them around to dislodge any dirt particles.
- Dry the produce using a clean towel or salad spinner to avoid diluting the juice’s flavors or introducing excess liquid.
Cutting And Preparing Fruits And Vegetables For Juicing:
- Remove any stems, seeds, or tough skins from fruits and vegetables as they can affect the juicer’s performance.
- Depending on the juicer’s feed chute size, cut larger produce into smaller pieces for easier juicing.
- For harder fruits and vegetables, such as carrots or apples, consider chopping them into smaller chunks to prevent strain on the juicer’s motor.
- De-seed citrus fruits and remove any large pits from other fruits like peaches or mangos.
- If incorporating leafy greens, such as kale or spinach, roll them into tight bundles and insert them into the feed chute gradually to ensure optimal extraction.
By following these guidelines for preparing fruits and vegetables for juicing with the breville juicer, you can maximize the efficiency and effectiveness of your juicing experience. Enjoy the fresh and flavorful juices that this powerful appliance can produce!
Operating The Breville Juicer
Operating the breville juicer is simple and efficient. With its user-friendly design, you can easily assemble, juice, and clean the machine in a matter of minutes. Get ready to enjoy fresh, nutritious juice with just a few easy steps.
The breville juicer is a versatile and efficient appliance that can help you create delicious and nutritious juices in no time. To ensure you get the best results from your juicer, it’s important to understand how to operate it properly.
In this section, we will guide you through the process of powering on the juicer, adjusting the speed settings, and troubleshooting any potential jams.
Powering On The Juicer
To get started with your breville juicer, follow these steps to power it on:
- Ensure the juicer is plugged into a reliable power source.
- Make sure the power switch located on the side or back of the juicer is in the “off” position.
- Press the power switch to turn on the juicer. You should see the motor start running, indicating it is ready for use.
Adjusting The Speed Settings
The breville juicer offers multiple speed settings to accommodate different types of fruits and vegetables. Follow these instructions to adjust the speed settings:
- Locate the speed control dial on the front of the juicer.
- Turn the dial to the desired speed setting. The lower speeds are ideal for softer fruits and leafy greens, while the higher speeds are suited for harder fruits and vegetables.
- Start with a lower speed setting and gradually increase if needed to extract maximum juice from your ingredients.
Jamming Prevention And Troubleshooting
While the breville juicer is designed to handle most fruits and vegetables, there may be instances where it encounters a jam. Here are some tips to prevent jamming and troubleshoot if it occurs:
- Cut fruits and vegetables into smaller pieces before feeding them into the juicer. This helps prevent clogs and ensures a smoother juicing process.
- Avoid overloading the juicer by adding ingredients in small batches, allowing the juicer to process each batch before adding more.
- If the juicer gets jammed, switch it off immediately and unplug it from the power source before attempting to clear the jam.
- Use the provided cleaning brush or a non-metal utensil to carefully dislodge any obstructing pulp or fibers that may be causing the jam.
- Once the jam is cleared, ensure all parts are securely reassembled before powering on the juicer again.
By following these simple steps for powering on the juicer, adjusting the speed settings, and troubleshooting potential jams, you can make the most of your breville juicer and enjoy refreshing and healthy juices whenever you desire. Happy juicing!
Extracting Juice With The Breville Juicer
Learn how to effortlessly extract juice with the breville juicer. This easy-to-use appliance makes juicing a breeze, providing fresh and healthy juice in minutes.
Are you ready to indulge in the goodness of fresh juice? The breville juicer is a powerful kitchen appliance that can turn your favorite fruits and vegetables into delicious and nutritious drinks. Let’s dive into the step-by-step process and some tips for maximizing juice extraction with this fantastic juicer.
Step-By-Step Process For Juicing Fruits And Vegetables
- Prepare your ingredients:
- Wash the fruits and vegetables thoroughly.
- Remove any seeds, pits, or tough skin.
- Set up the breville juicer:
- Place the juicer on a stable surface.
- Connect the power cord to an electrical outlet.
- Assemble the juicer:
- Attach the juicing cover to the top of the juicer.
- Place a juice jug or glass under the juicer’s spout to collect the extracted juice.
- Start juicing:
- Turn the power switch on.
- Slowly feed the fruits and vegetables into the juicer chute.
- Use the food pusher to gently guide the produce down the chute.
- Allow the juicer to process the ingredients and extract the juice.
- Collect the juice:
- Watch as the juice flows into the jug or glass.
- If the pulp begins to accumulate in the juicing cover, use the provided pulp container or remove it manually.
- Repeat the process:
- Continue adding fruits and vegetables until you have extracted the desired amount of juice.
- Take breaks if necessary to prevent the juicer from overheating.
- Clean the juicer:
- Disconnect the power cord from the electrical outlet.
- Disassemble the juicer by removing the juicing cover, pulp container, and other removable parts.
- Rinse each part with water and use a brush to gently scrub away any pulp or residue.
- Dry all parts thoroughly before reassembling or storing the juicer.
Tips For Maximizing Juice Extraction
- Choose ripe and fresh produce for the best flavor and maximum juice yield.
- Use a combination of hard and soft fruits and vegetables to create a balanced and flavorful juice.
- Cut larger ingredients into smaller pieces to fit easily through the chute and improve extraction efficiency.
- Alternate between different types of produce to prevent clogging and ensure optimal juice extraction.
- Experiment with different ingredient combinations to discover new and delicious juice recipes.
- Clean the juicer promptly after each use to maintain its performance and prolong its lifespan.
Now that you have learned the step-by-step process and some useful tips, it’s time to start juicing with the breville juicer. Sit back, relax, and enjoy the refreshing taste of homemade juice bursting with vitamins and nutrients. Cheers to a healthier lifestyle!
Cleaning And Maintenance Of The Breville Juicer
Learn how to effectively clean and maintain your breville juicer to optimize its performance and longevity. Discover simple steps and tips to ensure a seamless juicing experience.
Keeping your breville juicer clean and well-maintained is essential for optimal performance and longevity. Regular cleaning ensures that your juicer continues to operate smoothly and delivers fresh, delicious juices every time. In this section, we will guide you through the process of cleaning and maintaining your breville juicer, highlighting the important steps and techniques to follow.
Disassembling The Juicer For Cleaning
To properly clean your breville juicer, you’ll need to disassemble it first. Follow these steps to easily disassemble the juicer components:
- Remove the juice collector and pulp container: Start by lifting the juice collector and pulp container, located under the juicing chamber. Simply lift and pull them out gently.
- Separate the food pusher and juicer cover: Twist the juicer cover counterclockwise to unlock it. Then, lift it off along with the food pusher located inside the feeding chute.
- Detach the stainless steel filter bowl surround: To remove the stainless steel filter bowl surround, turn it counterclockwise and lift it up carefully.
- Take out the filter bowl and mesh filter basket: Twist the filter bowl counterclockwise to unlock it. Lift it off, revealing the mesh filter basket. Gently lift the mesh filter basket out of the filter bowl.
Remember to refer to your breville juicer’s instruction manual for precise instructions on disassembling specific models.
Proper Cleaning Techniques For Each Component
Each component of the breville juicer requires specific cleaning techniques to maintain its performance. Here are the proper cleaning methods for each juicer component:
- Juice collector and pulp container:
- Rinse them under warm running water to remove pulp residue.
- Use a mild dish soap and a soft brush to clean any stubborn pulp stains.
- Rinse thoroughly and dry before reassembling.
- Juicer cover, food pusher, and stainless steel filter bowl surround:
- Wash them in warm soapy water using a non-abrasive sponge.
- Rinse thoroughly, ensuring no soap residue remains.
- Dry all parts completely before reassembling.
- Filter bowl and mesh filter basket:
- Clean both components under warm running water immediately after use.
- Use the cleaning brush provided with your juicer to remove any pulp or fiber trapped in the mesh filter.
- Rinse thoroughly and air dry.
General Maintenance Tips For Keeping The Juicer In Good Condition
Apart from regular cleaning, there are general maintenance tips to keep your breville juicer in good condition. Consider the following:
- Avoid overloading the juicer: To prevent strain on the juicer’s motor, avoid adding too much produce at once. Feed fruits and vegetables gradually.
- Clear jams safely: If the juicer becomes jammed, turn off the juicer and unplug it before attempting to clear the jam. Follow the instructions provided in your juicer’s manual to remove any obstructions safely.
- Store the juicer correctly: Keep your juicer in a dry place away from direct sunlight. Ensure all components are dry before storing to avoid mold or mildew growth.
- Clean the juicer promptly: Clean the juicer immediately after each use to prevent residue from drying and becoming difficult to remove.
Regular cleaning and proper maintenance of your breville juicer will not only ensure its longevity but also guarantee that you can continue enjoying fresh, nutrient-rich juices with ease.
Juicing Tips And Tricks
Discover essential juicing tips and tricks for getting the most out of your breville juicer. Learn how to use this powerful machine to extract maximum nutrients and create delicious, refreshing juices with ease.
Juicing has become increasingly popular among health-conscious individuals looking for convenient ways to incorporate more fruits and vegetables into their diet. The breville juicer is a powerful tool that can help you extract the goodness from various produce. To make the most out of your juicing experience, consider the following tips and tricks:
Combining Fruits And Vegetables For Unique Flavors:
- Mix sweet fruits like apples and oranges with leafy greens such as spinach or kale to balance the flavors and add nutrients to your juice.
- Try blending carrots and beets with tangy fruits like pineapple or lime for a refreshing and zesty taste.
- Incorporate cucumber or celery to add a crisp and refreshing element to your juice.
- Experiment with different combinations of fruits and vegetables to create your own unique flavor profiles. Let your taste buds guide you!
Juicing For Specific Health Benefits:
- Include ginger or turmeric in your juice to boost anti-inflammatory properties.
- Add lemon or grapefruit to enhance detoxification effects.
- Use green vegetables like broccoli or cabbage to promote a healthy immune system.
- Consider incorporating berries like blueberries or strawberries for their antioxidant properties.
By choosing the right combination of fruits and vegetables, you can create juices that not only taste delicious but also provide specific health benefits. Remember to wash your produce thoroughly, cut them into manageable pieces, and adjust the juicing speed based on the type of ingredients.
Enjoy the process of experimenting with different flavors and reaping the rewards of a healthier lifestyle!
Happy Juicing!
Making Nut Milk And Nut Butters
Learn how to make delicious nut milk and nut butters using the breville juicer. This step-by-step guide will help you create healthy and homemade alternatives for dairy products. Enjoy the natural flavors without any additives or preservatives.
Using The Breville Juicer To Make Nut Milk:
Are you looking to incorporate nut milk into your diet? The breville juicer is here to make your life easier. With its versatile functions, it allows you to transform a variety of nuts into creamy and delicious milk. Here’s how you can use the breville juicer to make nut milk:
- Choose your nuts: Almonds, cashews, and walnuts are popular options for nut milk. You can experiment with different combinations or stick to a single nut for a pure flavor.
- Soak the nuts: To facilitate the blending process, soak the nuts in water for at least 4 hours or overnight. This softens them and enhances the creaminess of the milk.
- Drain and rinse the nuts: After soaking, drain the nuts and give them a quick rinse to remove any residue.
- Add the nuts to the juicer: Place the soaked and rinsed nuts into the breville juicer’s designated container.
- Start the juicer: Turn on the juicer and let it do its magic. The powerful motor will grind the nuts into a fine pulp, ready to be transformed into milk.
- Collect the nut milk: Position a large bowl or jug under the juicer’s spout to collect the freshly extracted nut milk. Ensure the receiving container has enough capacity to accommodate the desired quantity of milk.
- Strain the milk: To achieve a smooth and silky texture, strain the milk through a nut milk bag or a fine mesh strainer. This step removes any remaining pulp or solids, resulting in a velvety consistency.
- Store and enjoy: Transfer the freshly made nut milk into a sealed container and refrigerate. It can typically last for up to 3-4 days, but do check for any signs of spoilage before consuming. Savor the homemade nut milk in smoothies, cereal, or as a dairy-free alternative in your favorite recipes.
Creating Homemade Nut Butters With The Juicer:
Did you know that you can also make your own nut butters using the breville juicer? It’s incredibly simple and allows you to customize the flavors to suit your taste preferences. Here’s how you can create homemade nut butters with the juicer:
- Select your nuts: Almonds, cashews, peanuts, and hazelnuts are popular choices for nut butter. You can use a single type of nut or experiment with combinations for unique flavors.
- Roast the nuts: Preheat your oven to a low temperature, around 300°f (150°c). Spread the nuts evenly on a baking tray and roast them for 10-15 minutes, or until they become slightly golden and fragrant. This enhances the nutty flavor.
- Cool the roasted nuts: Allow the roasted nuts to cool completely before proceeding to the next step. This prevents the oils from separating too quickly during the juicing process.
- Add the nuts to the juicer: Place the cooled nuts into the juicer’s container, ensuring not to overload it. It’s best to process the nuts in smaller batches for optimal results.
- Start the juicer: Turn on the juicer and let it grind the nuts into a creamy butter-like consistency. The powerful motor of the breville juicer ensures effortless blending.
- Scrape down the sides: Occasionally pause the juicer and use a spatula to scrape down the sides of the container. This ensures that all the nuts are evenly blended, resulting in a smooth and creamy nut butter.
- Customize your nut butter: If desired, you can add a pinch of salt, honey, or other flavorings to enhance the taste of your nut butter. Experiment and find your perfect combination.
- Store and enjoy: Transfer the homemade nut butter into a clean jar and seal it tightly. Keep it refrigerated to maintain freshness. Spread it on toast, use it as a dip, or incorporate it into your favorite recipes.
By making nut milk and nut butters with the breville juicer, you can enjoy the goodness of homemade plant-based creations effortlessly. Let your creativity flow and explore the wide range of flavors and possibilities.
Juices, Smoothies, And Mocktails Recipes
Discover a variety of delicious and healthy juice, smoothie, and mocktail recipes, and learn how to make them using the breville juicer. Enjoy refreshing drinks that are easy to prepare and packed with nutritious goodness.
Refreshing Juice Recipes For Different Tastes:
- Spicy carrot-apple juice: A zesty combination of carrots, apples, ginger, and a touch of cayenne pepper. Start your day with a kick!
- Green detox juice: Boost your energy levels with a blend of kale, cucumber, celery, green apple, lemon, and mint. Feel refreshed and rejuvenated.
- Tropical pineapple-orange juice: Transport yourself to a tropical paradise with this sweet and tangy blend of pineapple and orange. Perfect for a summer escape.
- Berry blast juice: Indulge in the vibrant flavors of mixed berries, beets, and a hint of lime. Packed with antioxidants, this juice is a real berrylicious treat.
- Citrus burst juice: Wake up your taste buds with a burst of citrus goodness. Oranges, lemons, and grapefruits come together for a vitamin c-packed delight.
Healthy Smoothie Variations Using The Juicer:
- Green goddess smoothie: Fuel your body with a nutritious blend of kale, spinach, banana, avocado, almond milk, and a touch of honey. A delicious way to get your greens!
- Berry bliss smoothie: Savor the divine combination of mixed berries, greek yogurt, almond milk, and a sprinkle of chia seeds. Full of antioxidants and bursting with flavor.
- Creamy mango coconut smoothie: Transport yourself to a tropical paradise with this luscious blend of mango, coconut milk, greek yogurt, and a squeeze of lime. A taste of paradise in a glass.
- Protein power smoothie: Pump up your workout with a protein-packed smoothie! Combine banana, peanut butter, almond milk, vanilla protein powder, and a dash of cinnamon for a satisfying treat.
Non-Alcoholic Mocktail Recipes For Special Occasions:
- Virgin mojito: Quench your thirst with this classic mocktail. Mint leaves, lime juice, soda water, and a touch of sugar come together for a refreshing and tangy delight.
- Pomegranate sparkler: Elevate any celebration with this sparkling mocktail. Pomegranate juice, soda water, a splash of lime, and a garnish of fresh mint create a vibrant and festive drink.
- Mock champagne: Toast to special occasions with this bubbly mocktail. Combine sparkling water, white grape juice, and a squeeze of lemon for a sophisticated and alcohol-free alternative.
- Strawberry basil smash: Indulge in the flavors of summer with this mocktail. Fresh strawberries, basil leaves, lemon juice, and a touch of honey create a delightful and aromatic drink for any gathering.
Whether you’re in the mood for a refreshing juice, a healthy smoothie, or a special mocktail, your breville juicer is the perfect tool to create a variety of delicious beverages. Explore these recipes and let your taste buds be delighted.
So grab your ingredients, fire up the juicer, and get ready for a delightful journey of flavors!
Frequently Asked Questions On How To Use The Breville Juicer
How Do You Use A Juicer Step By Step?
Using a juicer is easy when you follow these simple steps. First, assemble the juicer according to the manufacturer’s instructions. Next, prepare your fruits and vegetables by washing them thoroughly. Peel and cut into smaller pieces if necessary. Then, turn on the juicer and slowly feed the produce into the feeding chute.
Use the plunger to push the ingredients down gently. As the juicer extracts the juice, collect it in a container placed under the spout. Once you have finished juicing, turn off the machine and clean it immediately to avoid any residue buildup.
Disassemble the juicer and rinse the parts with warm soapy water. Wipe dry and store them properly. Enjoy your freshly made juice!
How Do You Set Up A Breville Juicer?
To set up a breville juicer, follow these simple steps: 1. Place the juicer on a sturdy, level surface near a power outlet. 2. Ensure the juicer is unplugged and all parts are clean and dry. 3. Assemble the juicer by attaching the pulp container, juice jug, and food pusher.
4. Place a glass or jug under the juice spout to catch the extracted juice. 5. Plug in the juicer and turn it on. 6. Cut fruits or vegetables into smaller pieces and feed them into the feed chute using the food pusher.
7. Use the speed control dial to adjust the juicing speed to your preference. 8. Allow the juicer to extract the juice, while making sure to remove any accumulated pulp from the pulp container. 9. Once juicing is complete, turn off the juicer and unplug it from the power outlet.
10. Disassemble the juicer and clean all the removable parts thoroughly. Following these steps will help you set up your breville juicer easily and start enjoying fresh, homemade juices.
Do I Have To Peel Oranges Before Juicing In The Breville?
Yes, you need to peel oranges before juicing them in the breville.
How Do You Use A Breville Juice Press?
To use the breville juice press, follow these steps: first, assemble the juicer by attaching the filter bowl surround and the juicing bowl. Next, insert the desired filter into the juicing bowl. Then, cut fruits or vegetables into manageable pieces and place them in the feed chute.
Ensure that the pusher is inserted correctly. Turn on the juicer and slowly push the ingredients down the chute using the pusher. The juice will be extracted and separated from the pulp, which is collected in the pulp container. To extract more juice, gently press the ingredients with the pusher.
Once all the juice has been extracted, turn off the juicer and pour the juice into a glass. Clean the juicer thoroughly after use by disassembling the parts and washing them with warm soapy water. Ensure that all parts are completely dry before reassembling.
Conclusion
Incorporating the breville juicer into your daily routine can truly transform your health and well-being. By following the step-by-step instructions outlined in this blog post, you can seamlessly incorporate fresh fruits and vegetables into your diet and enjoy the numerous health benefits they provide.
Not only does the breville juicer extract maximum juice from your produce, but it also ensures that you are getting all of the essential nutrients and vitamins. Say goodbye to store-bought juice filled with added sugars and preservatives, and hello to vibrant and nutritious homemade juice.
With its user-friendly design and powerful performance, the breville juicer makes juicing a breeze for beginners and experts alike. So, dust off that neglected juicer and start experimenting with different fruit and vegetable combinations to find your perfect blend. Your body will thank you for it!

Freda is a passionate foodie and kitchen gadget enthusiast. With over 10 years of experience in the culinary industry, Freda brings her expertise in testing and reviewing kitchen gadgets.