
To build a range hood box, measure and cut plywood panels to create a rectangular frame. Assemble the frame using screws and add plywood panels for the sides, top, and back.
Finally, install the range hood and fasten the box to the wall. Building a range hood box requires measuring and cutting plywood panels to form a rectangular frame, assembling the frame using screws, adding plywood panels for the sides, top, and back, installing the range hood, and fastening the box to the wall securely.
By following these steps, you can create a functional and aesthetically pleasing range hood box for your kitchen.

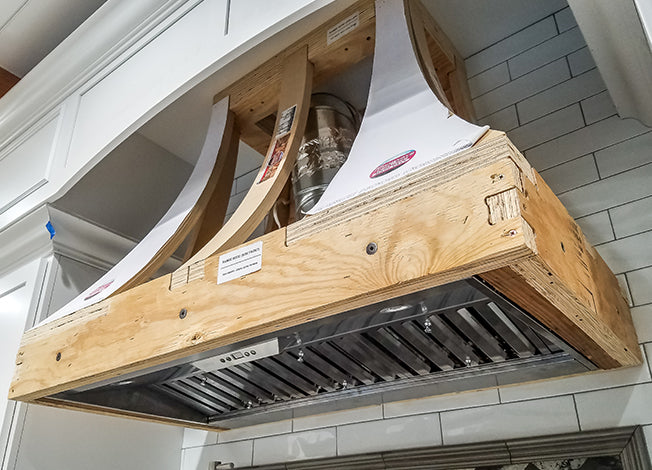
Credit: www.archwaysandceilings.com
Tools And Materials Needed
When it comes to building a range hood box, it’s important to have the right tools and materials at hand. Whether you’re a seasoned diy enthusiast or a beginner looking to tackle a new project, having the proper equipment will make the job much easier.
From cutting and measuring to securing and finishing, the following list of tools and materials will ensure you have everything you need to build a functional and stylish range hood box.
List Of Tools Required For The Project:
- Tape measure: To accurately measure the space where the range hood will be installed.
- Pencil: For marking measurements and guidelines on the materials.
- Circular saw or jigsaw: To make precise cuts on the wood or other materials used for the box.
- Power drill: For making pilot holes and securing screws or nails.
- Screwdriver: To tighten screws or remove them when needed.
- Clamps: To hold materials in place while cutting or assembling.
- Level: To ensure the range hood box is installed straight and even.
- Safety goggles: To protect your eyes from any debris or dust.
- Dust mask: To filter out any particles that may be released during the cutting or sanding process.
- Sandpaper or sanding block: To smooth out rough edges and surfaces.
Necessary Materials And Supplies:
- Plywood or mdf sheets: Used for constructing the main structure of the range hood box.
- Wood glue: To bond the pieces of wood together securely.
- Wood screws or nails: To attach the different components of the box.
- Wood filler: To fill any gaps or imperfections in the wood before painting or finishing.
- Primer: To create a smooth and even surface for the paint.
- Paint: To add a touch of color and protect the range hood box from moisture and stains.
- Paintbrush or roller: For applying the paint evenly.
- Ventilation duct: To connect the range hood box to an external exhaust system.
- Silicone sealant: To seal any gaps or joints to prevent air leaks.
- Mounting brackets or screws: To secure the range hood box to the wall or ceiling.
By having a comprehensive set of tools and the necessary materials and supplies, you’ll be equipped to confidently build your own range hood box. With a bit of patience and careful attention to detail, you’ll soon have a functional and visually appealing addition to your kitchen.
Planning And Preparation
Before you start building your range hood box, it’s important to take the time to plan and prepare for the project. This will help ensure that everything goes smoothly and that you end up with a box that fits your range hood perfectly.
In this section, we will go over two key steps in the planning and preparation process: measuring the existing range hood and sketching the design and dimensions of the box.
Measuring The Existing Range Hood
- Begin by measuring the width, depth, and height of your existing range hood. These measurements will serve as the foundation for your box design, so it’s crucial to be accurate.
- Use a measuring tape to determine the width of your range hood, from one side to the other. Write down this measurement.
- Next, measure the depth of your range hood. This is the distance from the front of the range hood to the wall behind it. Note this measurement as well.
- Finally, measure the height of your range hood. This is the distance from the bottom of the range hood to the top. Remember to record this measurement too.
Sketching The Design And Dimensions Of The Box
- Once you have your measurements, it’s time to sketch the design and dimensions of your range hood box. This will help you visualize how the final product will look and ensure that it fits perfectly over your range hood.
- Start by drawing a rectangle that represents the width and depth of your range hood on a piece of graph paper or a blank sheet.
- Using the height measurement you took earlier, draw vertical lines at each corner of the rectangle to indicate the height of the box.
- Add any additional features or details that you want to include in your box, such as a frame or decorative elements.
- Take note of the dimensions you used in your sketch, as these will be crucial when it comes time to gather materials and build the box.
By following these planning and preparation steps, you’ll be well on your way to building a range hood box that fits your needs and adds a touch of style to your kitchen.
Building The Frame
Cutting And Assembling The Wooden Frame
Building a range hood box is not as complicated as it may seem. The first step in this process is cutting and assembling the wooden frame. By following these steps, you can create a sturdy and reliable frame for your range hood.
Here are the key points to keep in mind:
- Measure the dimensions: Before cutting any wood, take accurate measurements of the range hood’s size and the space it will occupy. This will ensure the frame fits perfectly.
- Choose the right material: Opt for a strong and durable wood, such as plywood or mdf. These materials are sturdy enough to support the weight of the range hood and withstand the moisture in the kitchen.
- Cut the pieces: Use a circular saw or a miter saw to cut the wood into the required lengths. Make sure to follow the measurements precisely for each piece.
- Assemble the frame: Begin by attaching the sides to the back piece using wood screws or nails. Then, attach the top piece to the sides. Ensure that the pieces are aligned properly before securing them together.
- Reinforce the corners: To enhance the stability and durability of the frame, reinforce the corners. Use metal brackets or corner braces on each corner, securing them with screws. This will prevent any wobbling or shifting of the frame.
- Sand and finish: Once the frame is assembled, take the time to sand any rough edges or surfaces. Apply a coat or two of paint or wood stain to protect the wood and enhance its appearance.
By following these steps, you will be able to cut and assemble a solid wooden frame for your range hood box. It is essential to take accurate measurements, choose the right materials, and reinforce the corners for stability and durability.
With a well-built frame, you can proceed to the next steps of building your range hood box. So, let’s move on to reinforcing the corners for a sturdy and long-lasting construction.
Installing The Sides And Top
Installing the sides and top of your range hood box is a crucial step in creating a functional and aesthetically pleasing addition to your kitchen. In this section, we will guide you through the process of attaching the side panels to the frame and securing the top panel for a snug fit.
By following these steps, you’ll be one step closer to having a custom-built range hood box that perfectly complements your kitchen decor.
Attaching The Side Panels To The Frame:
- Start by aligning the side panel with the corresponding edges of the frame. Ensure that the edges are flush and level before proceeding.
- Use screws or nails to secure the side panel to the frame at regular intervals. Make sure to choose the appropriate size and type of fasteners that will securely hold the panels in place.
- Double-check the alignment and stability of the side panel before moving on to the next step.
- Repeat the process for the other side panel, ensuring that both panels are affixed firmly and evenly to the frame.
Securing The Top Panel For A Snug Fit:
- Measure the dimensions of your range hood box frame and cut a top panel to fit precisely.
- Place the top panel over the frame, ensuring that it sits flush with the sides and back.
- Secure the top panel to the frame using screws or nails. Be mindful of the placement and spacing to ensure a secure fit.
- Verify that the top panel is adequately attached and aligned with the other components of the range hood box.
By following these steps, you will be well on your way to completing the installation of the sides and top of your range hood box. These essential elements not only add structural integrity but also contribute to the overall appearance of your diy project.
With each component securely attached and aligned, you can proceed confidently to the next stage of building your range hood box.
Adding The Back Panel
Aligning And Attaching The Back Panel To The Box
As you continue building your range hood box, it’s important to properly align and attach the back panel to ensure the stability and functionality of the unit. Here are some key points to keep in mind:
- Measurements and alignment: Take precise measurements of the back panel and the corresponding area on the box. Make sure the panel is aligned correctly with the sides and top of the box for a snug and secure fit.
- Attaching the back panel: Once you have the measurements and alignment in place, it’s time to attach the back panel to the box. Use screws or nails to secure the panel in place, ensuring a strong and durable connection.
- Ventilation openings: While attaching the back panel, don’t forget to create proper ventilation openings. These openings will allow the range hood to effectively remove smoke, odors, and heat from your kitchen. Drill carefully measured holes or cut out slots to ensure efficient airflow.
- Ventilation duct connection: If your range hood requires a duct for ventilation, make sure to align and attach the back panel accordingly. Ensure that the duct connects seamlessly to the box, allowing for smooth airflow.
- Finishing touches: Once the back panel is securely attached and the ventilation openings are in place, take some time to inspect and make any necessary adjustments. Ensure that the panel is flush with the rest of the box and that there are no gaps or loose connections.
By following these key points, you can successfully align and attach the back panel to your range hood box. This step is crucial for the overall functionality and efficiency of your homemade range hood. With the back panel securely in place, you’re one step closer to enjoying a well-ventilated kitchen space.
Installing The Front Panel
Once you have successfully cut an opening for the range hood unit, the next crucial step is to install the front panel securely. This is an important part of constructing your range hood box, as it not only contributes to the overall aesthetics but also ensures that the front of the range hood is properly supported.
Here are the key points to consider when installing the front panel:
- Align the front panel: Ensure that the front panel is aligned properly with the rest of the range hood box structure. This will help create a seamless and symmetrical appearance.
- Secure the front panel: Attach the front panel securely to the range hood box using suitable screws or nails. This will provide stability and prevent any potential sagging or misalignment over time.
- Check for levelness: Use a level to ensure that the front panel is perfectly level both horizontally and vertically. A slight deviation can affect the overall presentation and functionality of the range hood.
- Reinforce with corner braces: Consider using corner braces to reinforce the connections between the front panel and the rest of the range hood box. This additional support can help improve the overall durability and longevity of the range hood.
- Seal any gaps: Use caulking or sealant to fill any gaps between the front panel and the range hood box. This will not only enhance the appearance but also prevent any air leakage or insulation issues.
By following these steps, you can ensure a secure and visually appealing installation of the front panel for your range hood box. Take your time during this process to achieve the best possible results.
Finishing Touches
Building a range hood box is a great way to add a stylish and functional touch to your kitchen. Once you have constructed the basic box structure, it’s time to move on to the finishing touches that will really make your range hood box shine.
In this section, we will guide you through the steps of sanding the surfaces for a smooth finish and applying a coat of paint or stain.
Sanding The Surfaces For A Smooth Finish:
- Start by using a medium-grit sandpaper to gently sand the entire surface of the range hood box. This will help to smooth out any rough edges or imperfections.
- Pay special attention to the corners and edges, as these areas tend to be the most uneven.
- Once you have finished sanding with the medium-grit sandpaper, switch to a finer-grit sandpaper to achieve an even smoother finish.
- Be sure to sand in the direction of the grain for wooden surfaces, as this will help to prevent any cross-grain scratches.
Applying A Coat Of Paint Or Stain:
- Before applying any paint or stain, make sure to clean the surface of the range hood box thoroughly to remove any dust or debris.
- If you prefer a natural wood look, you can apply a coat of stain to enhance the grain and protect the wood.
- If you prefer a painted finish, choose a high-quality paint specifically designed for use on wood surfaces.
- Apply the paint or stain evenly using a brush or roller, following the manufacturer’s instructions for drying and recoating times.
- Depending on the look you desire, you may need to apply multiple coats of paint or stain, allowing each coat to dry completely before applying the next.
By following these steps for sanding and finishing your range hood box, you can create a beautiful and functional focal point for your kitchen. Whether you choose a painted or stained finish, the end result will be a stunning addition to your culinary space.
So, let’s put on our work gloves and get ready to add those finishing touches!
Mounting The Range Hood Box
When it comes to installing a range hood box, proper mounting is crucial to ensure effective ventilation in your kitchen. In this section, we will guide you through the process of positioning and securing the range hood box above your cooking area.
Let’s get started:
Positioning The Box Above The Cooking Area
- Ensure that the range hood box is positioned at least 24-30 inches above your cooking surface. This allows for maximum efficiency in capturing airborne grease and cooking odors.
- Use a tape measure to determine the ideal position for your range hood box. Measure the distance from the cooktop to the bottom of the range hood box, taking into consideration any cabinets or obstructions in the area.
- Center the box directly above the cooking area to ensure even suction and proper ventilation.
Securing The Box To The Wall Or Cabinet
- Before securing the range hood box, make sure to turn off the power supply to the range hood.
- For wall-mounted range hoods, locate the studs behind the wall and mark their positions. These studs will provide the necessary support for the range hood box.
- Align the range hood box with the marked studs and use a drill to create pilot holes in the appropriate spots.
- Insert screws through the pilot holes to securely attach the range hood box to the wall.
- If mounting the range hood box to a cabinet, ensure that the cabinet is structurally sound and can support the weight of the box.
- Use screws or brackets to secure the range hood box to the cabinet, following the manufacturer’s instructions.
Remember to consult the specific installation guidelines provided by the manufacturer of your range hood box for detailed instructions and any additional considerations. By following these steps, you can effectively mount your range hood box and enjoy a well-ventilated and odor-free kitchen.
Happy cooking!
Frequently Asked Questions On How To Build A Range Hood Box
How Do I Build A Range Hood Box?
To build a range hood box, start by measuring the dimensions of your range hood. Then, cut plywood panels to create the sides, top, and bottom of the box. Assemble the panels using nails or screws. Finish by attaching the box to the wall above the range and connecting the range hood.
What Materials Do I Need To Build A Range Hood Box?
To build a range hood box, you will need plywood or mdf panels for the sides, top, and bottom of the box. Additionally, you will need nails or screws to assemble the panels, and appropriate hardware to attach the box to the wall and connect the range hood.
Can I Customize The Design Of My Range Hood Box?
Yes, you can personalize the design of your range hood box to match your kitchen decor. Consider adding decorative trim, painting or staining the box, or using a different material such as reclaimed wood. Just ensure that the box is properly sized to accommodate your range hood.
Conclusion
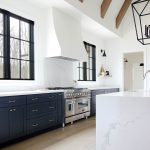
Building a range hood box is a practical and efficient way to enhance your kitchen’s functionality and overall aesthetic. By following the step-by-step instructions provided, you can create a custom range hood that suits your specific needs and design preferences.
Remember to measure accurately, use high-quality materials, and take safety precautions throughout the process. Whether you are a seasoned diy enthusiast or a beginner, this project is easily achievable with the right tools and commitment. Once completed, your range hood box will not only effectively remove cooking odors and smoke, but it will also add a stylish and personalized touch to your kitchen.
So, why wait? Dive into this creative endeavor and enjoy the benefits of a well-designed range hood that will transform your cooking space into a more enjoyable and efficient environment. Happy building!

Freda is a passionate foodie and kitchen gadget enthusiast. With over 10 years of experience in the culinary industry, Freda brings her expertise in testing and reviewing kitchen gadgets.